

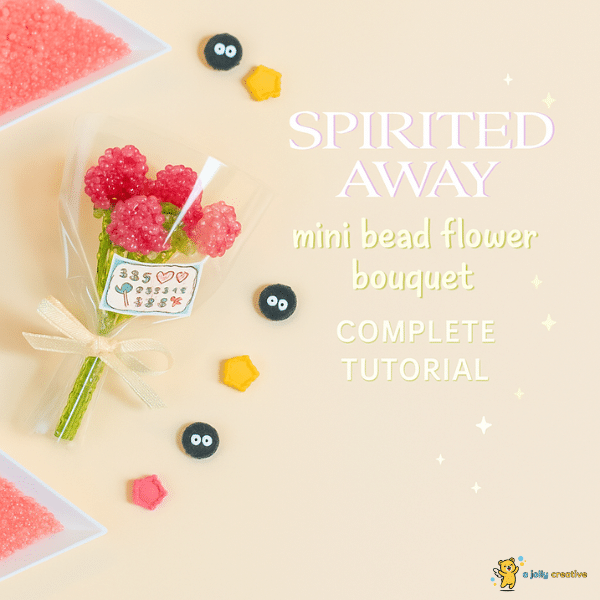
Bring the magic of Spirited Away to life with a super cute mini bead flower bouquet! This fun craft lets every one create Chihiro’s special bouquet from the movie using tiny seed beads, sparkling like the film’s magic.
With simple beads and wire, this Spirited Away bouquet project is easy and exciting! Stringing tiny beads to make delicate flowers is relaxing and creates a beautiful keepsake. Perfect for Studio Ghibli fans or every one who love mini crafts, grab your beads and let’s make a blooming masterpiece!
The Plan
Understanding your Spirited Away mini bead flower bouquet project begins with proper planning and material organization.
What We’re Making
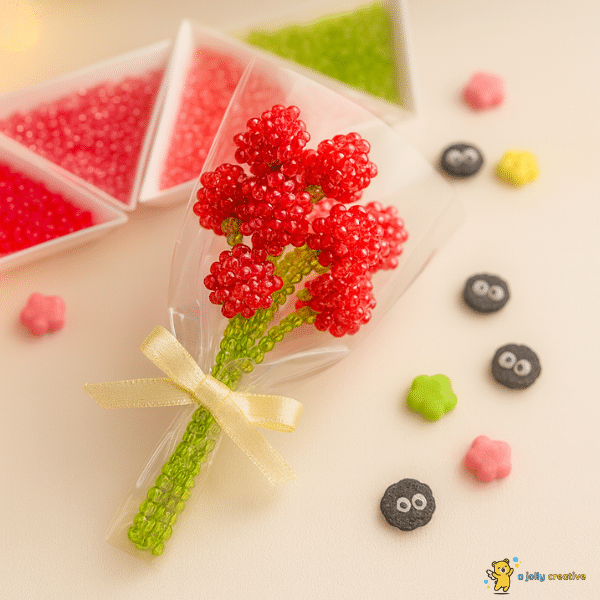
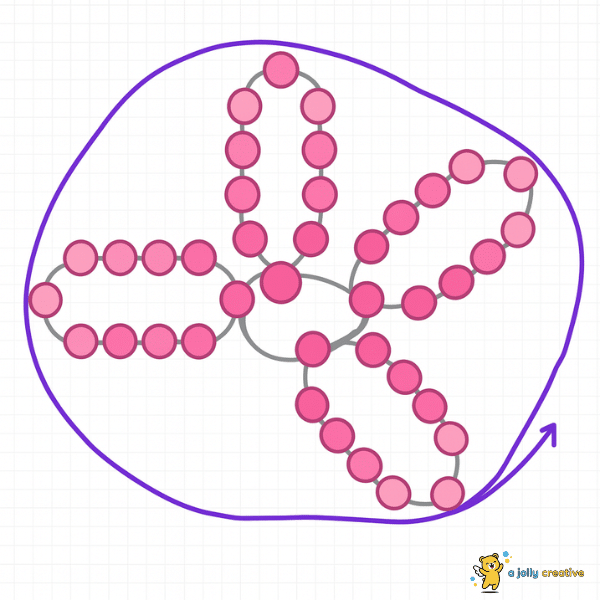
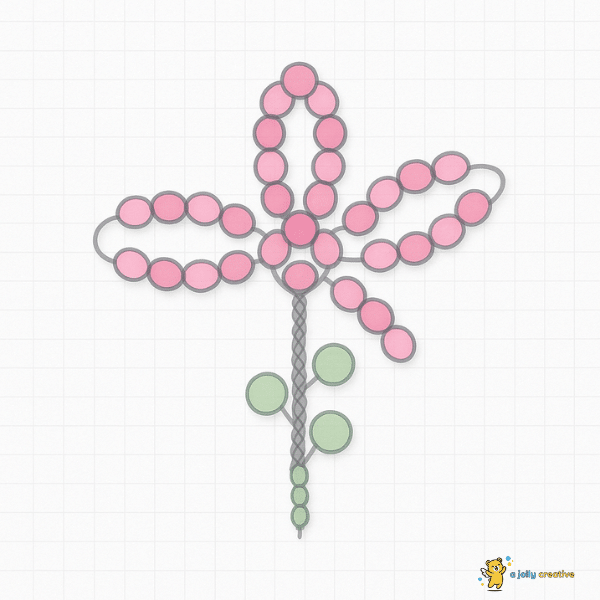
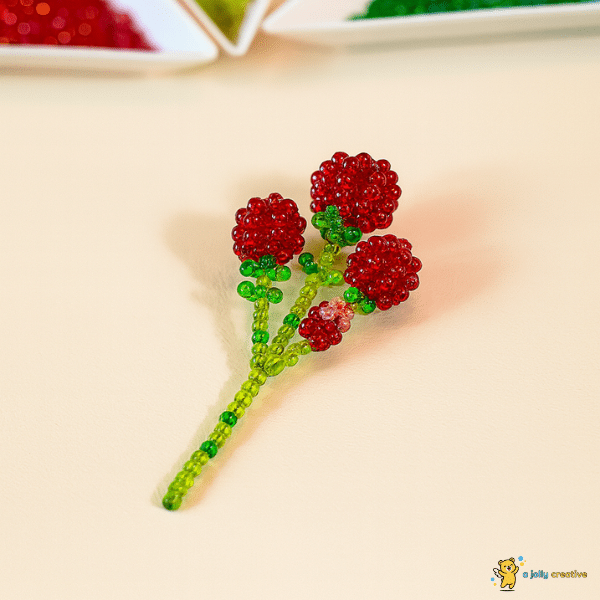
Your finished Ghibli crafts project recreates the magical bouquet Chihiro receives before leaving the spirit world. Each flower features translucent petals created from carefully graduated seed beads that catch light beautifully.
The complete bouquet includes 5-7 individual flowers with varied sizes and subtle color differences. Supporting elements like leaves and decorative stems enhance the natural appearance.
Step-by-Step Overview
This seed bead crafts tutorial follows a logical progression from basic techniques to complex assembly methods.
The process involves creating individual flower components, assembling them into complete blooms, crafting realistic stems, and finally arranging everything into a cohesive bouquet.
Why This Approach Works
The systematic method ensures consistent quality across all flowers while building confidence through incremental skill development. Starting with basic techniques prevents frustration and creates positive crafting experiences.
Time Expectations
Plan approximately 15-20 hours for complete seed bead bouquet creation spread across multiple sessions. Individual flowers require 2-3 hours each for beginners.
You may also like to read: 43+ Cute and Easy Ghibli Drawing Ideas
Material
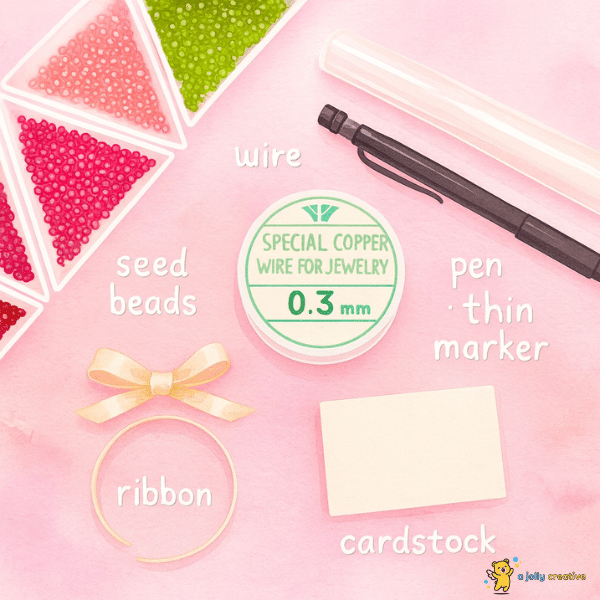
Quality materials form the foundation of successful Studio Ghibli inspired crafts projects. Invest in high-grade seed beads with consistent sizing and color saturation for professional results.
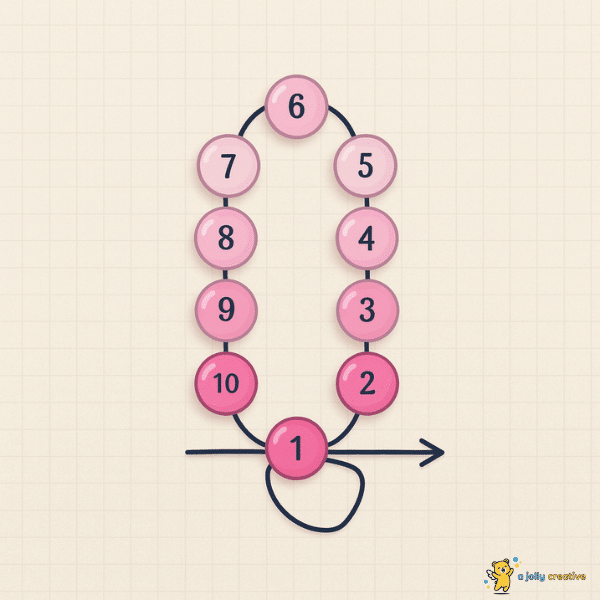
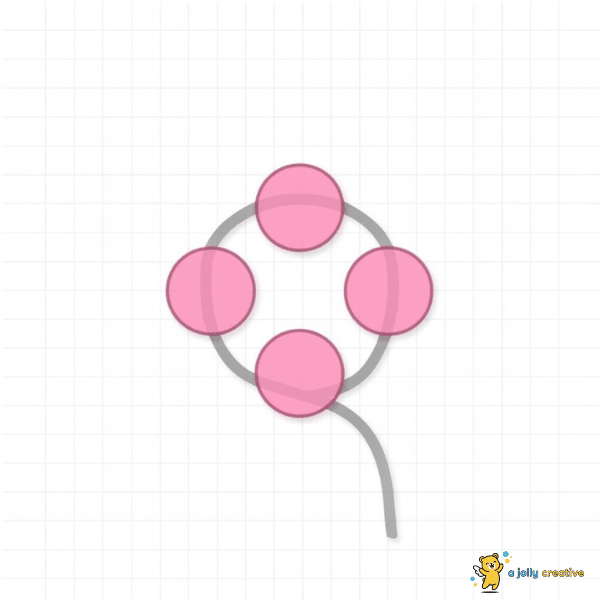
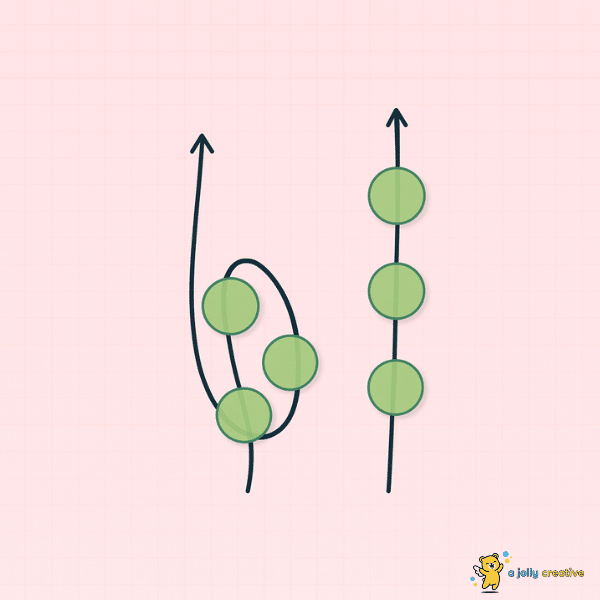
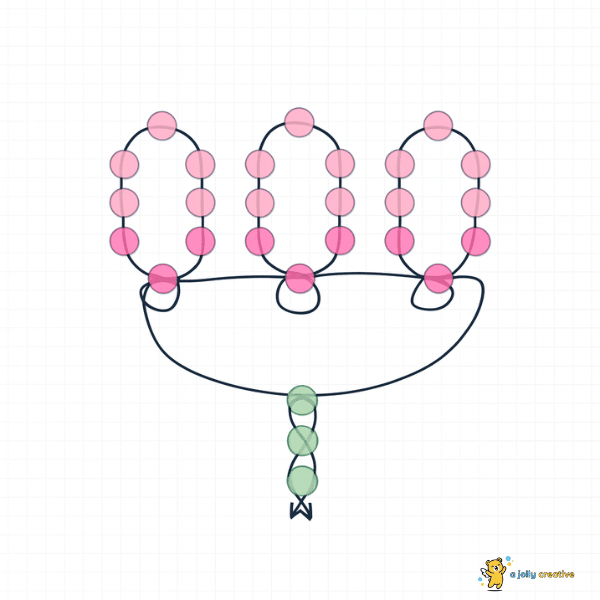
Making the Flower Head
Begin your miniature seed bead projects with the flower center using 8-10 pearl white beads threaded onto 28-gauge copper wire. Create a tight loop measuring approximately 1/4 inch across.
Creating the Bead Gradient
Master gradient creation by planning color transitions before threading begins. Lay out bead sequences on your work mat, showing gradual shifts from light to dark.
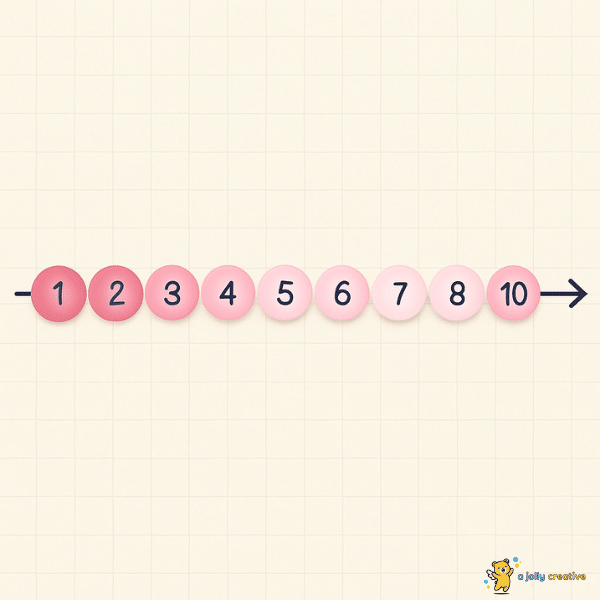
Successful DIY Spirited Away bouquet gradients require odd numbers of transition colors to avoid obvious midpoint changes.
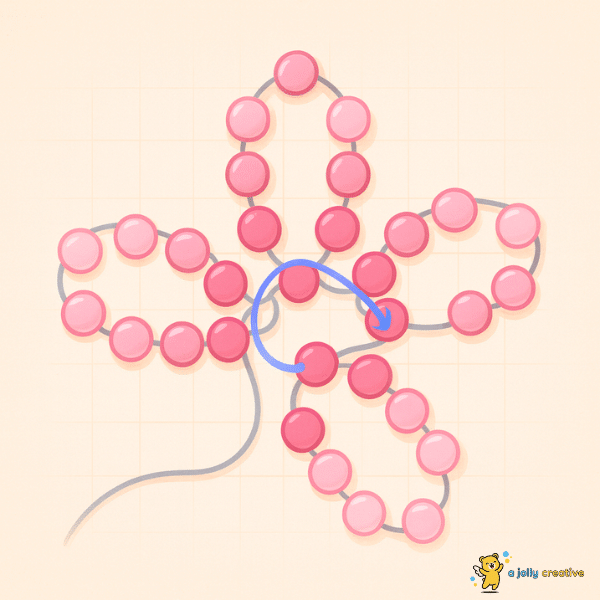
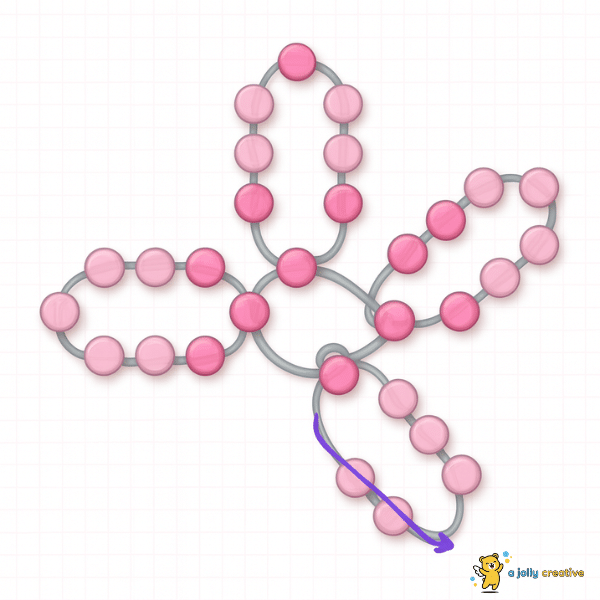
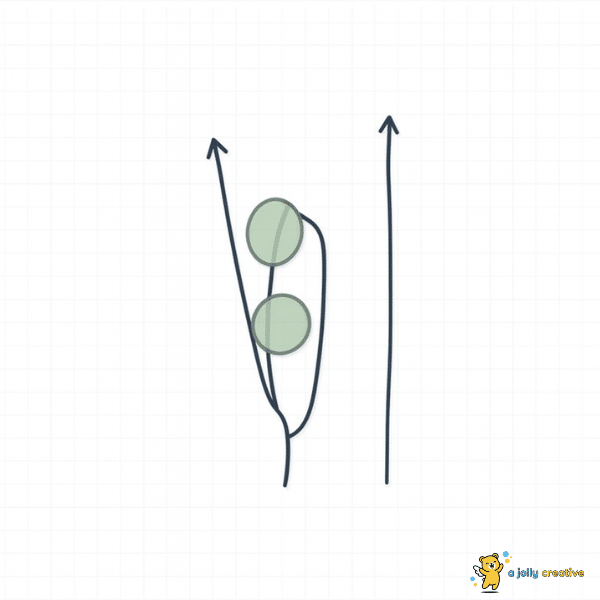
Making the First Petal

Thread 18-22 beads for each petal, starting with your lightest shade at the tip. Create elongated loops with gentle curves rather than sharp angles.
Maintain consistent wire tension throughout threading to ensure uniform petal shapes. The first petal sets the standard for all subsequent ones.
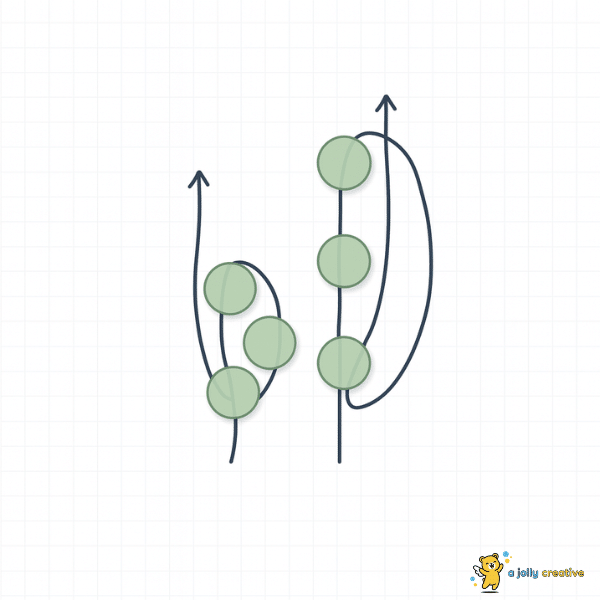
Creating Additional Petals
Position each new petal to cover approximately 1/3 of the previous petal’s base. Rotate placement slightly with each addition to form spiral patterns.
Securing the Flower Head
Twist all petal wire stems together clockwise for at least 1 inch below the flower head. This creates sturdy attachment points for main stem connection.
Finishing the Top
Complete flower head assembly by checking petal alignment from multiple angles. Adjust positions while wire remains workable.
Add any final detail work like positioning special accent beads.
This attention distinguishes handcrafted Ghibli fan art from amateur attempts.
If you’re interested, check out: 23+ Cute & Free Amigurumi Crochet Patterns for Beginners
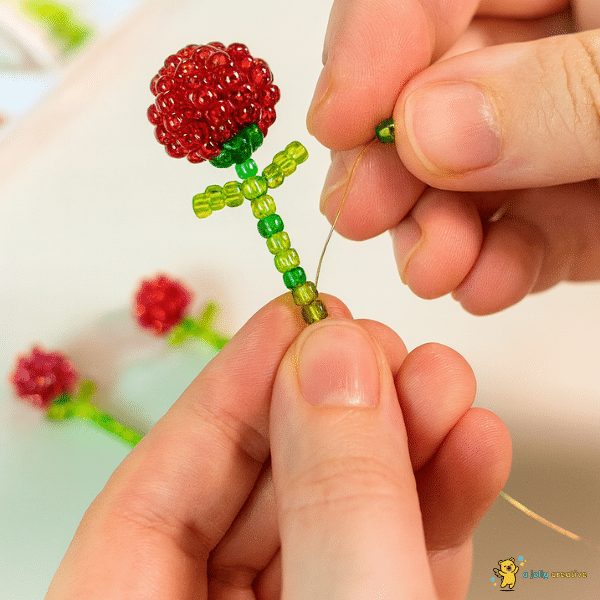
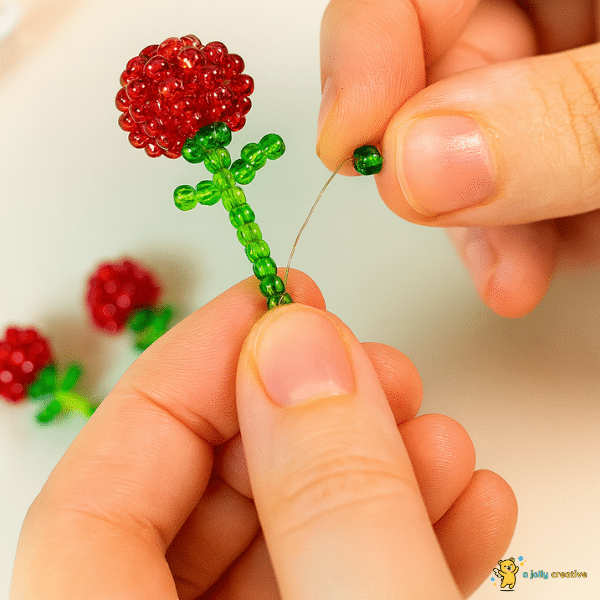
Making the Stem
Cut 20-gauge green floral wire to 4-inch lengths for adequate stem support while maintaining arrangement flexibility.
Preparing the Wire for the Stem
Start wrapping 1/2 inch from the top in tight, overlapping coils.
The dual-wire system combines strength with flexibility necessary for professional bouquet arrangement.

Practice this technique on spare wire before working on actual stems to develop proper muscle memory.
Creating the Leaves

Realistic leaves elevate your miniature crafts from basic to professional quality.
Thread 12-15 green beads in graduating sizes with the largest at the leaf center.
Form pointed oval shapes measuring 1/4 inch wide by 3/8 inch long using the same loop technique as petals.
Create multiple leaves per stem for fuller, more convincing appearance that mimics actual plant growth patterns.
Twisting the Stem

Maintain clockwise twisting direction throughout stem assembly for uniform spiral patterns. Begin twisting at the flower attachment point and continue down the entire length.
Adding Stem Beads
Thread small green accent beads irregularly along wrapped stems to suggest natural plant textures. Concentrate more beads near flower bases with fewer toward stem ends.
Securing the Stem

Complete stem assembly by wrapping with green floral tape stretched slightly to activate adhesive properties. Begin at flower bases and wrap downward in overlapping spirals.
You might find this interesting: 23+ Free Duck Amigurumi Patterns You’ll Absolutely Love
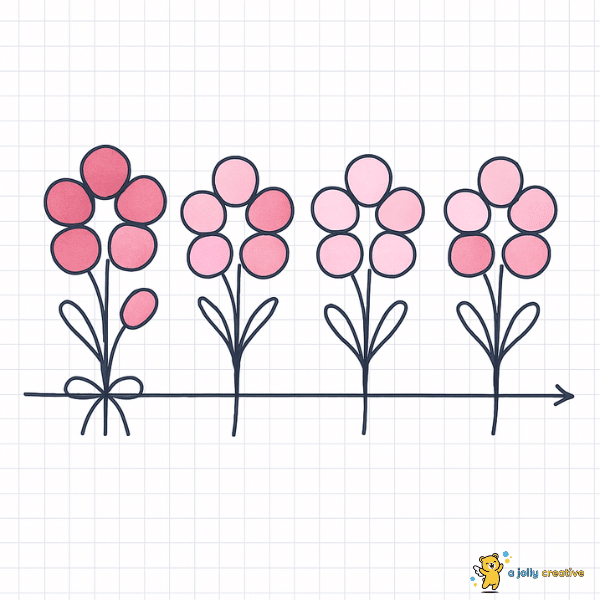
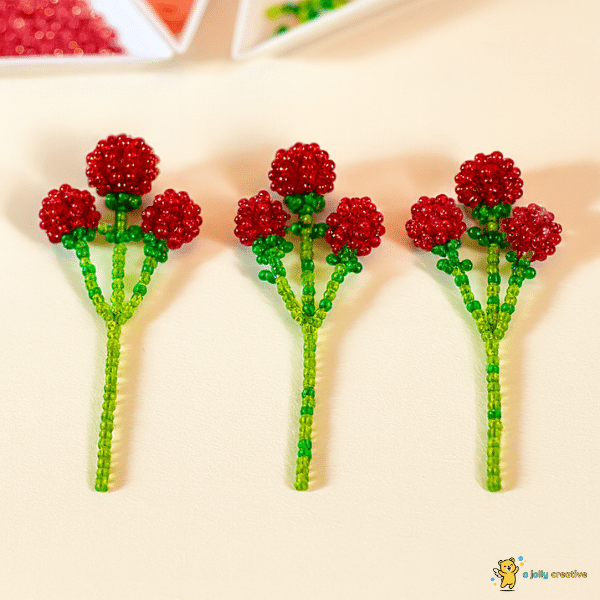
Making Multiple Flowers

Expand your miniature flower bouquet DIY collection with varied bloom sizes for natural bouquet hierarchy. Small flowers need only 4-5 petals with proportionally scaled petal counts.
Creating Small Flowers
Maintain consistent bead sizes across all flowers to preserve proper scale relationships. Buds use deeper colors throughout rather than gradient effects.
Varying the Gradients
Develop multiple gradient schemes inspired by Spirited Away color palettes. White and pale pink form foundations with lavender and soft yellow providing contrast.
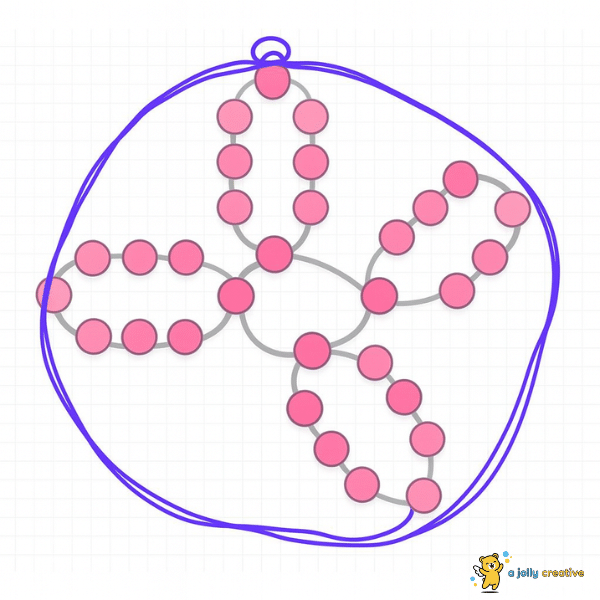
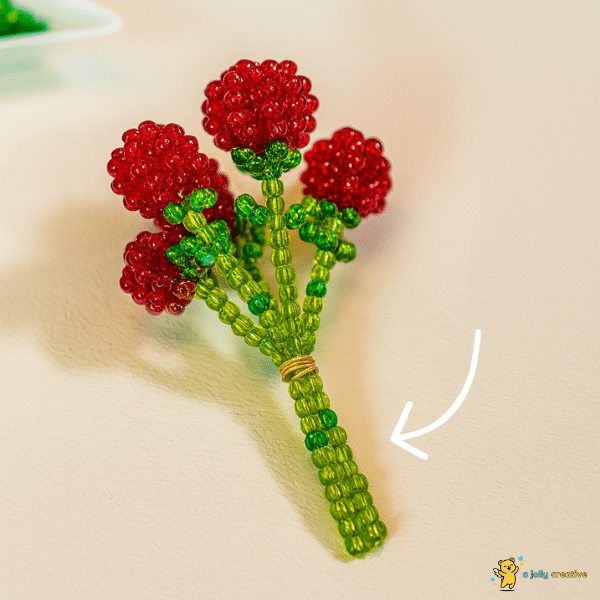
Assembling the Bouquet
Professional bead flower bouquet tutorial assembly requires understanding visual composition principles. Place your largest, most colorful flower slightly off-center as the primary focal point.
Combining Flowers

This creates visual flow that encourages examination of the entire arrangement while maintaining overall harmony.
Vary heights within each cluster to prevent static appearances.
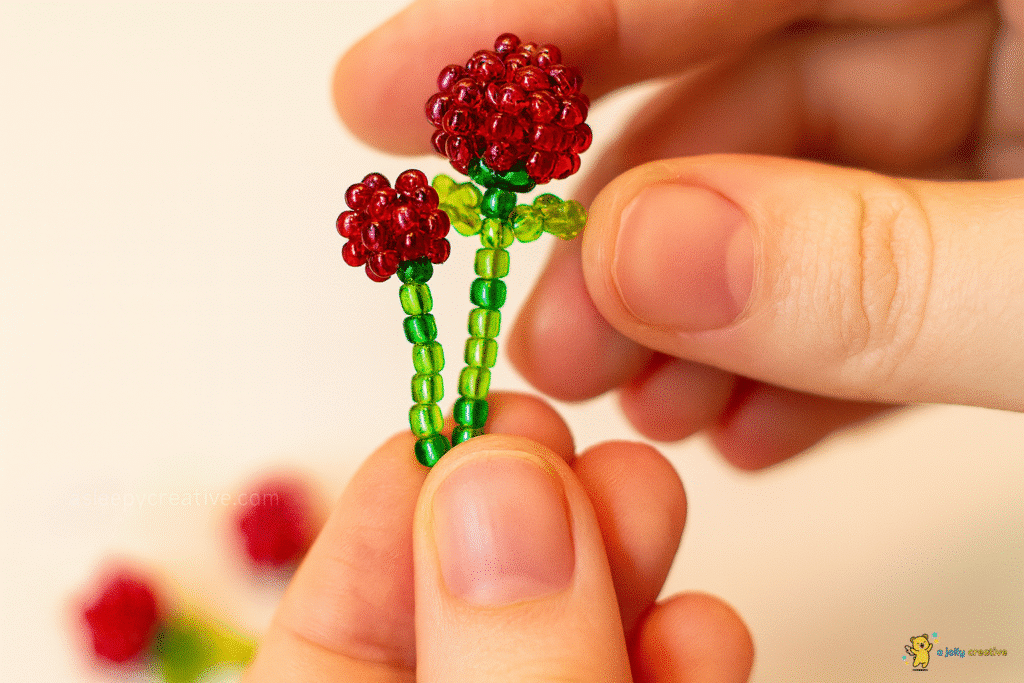
Establish a height hierarchy with the tallest flower in back-center position, gradually decreasing toward front and sides.
Adding Green Accents
Incorporate leaf elements strategically throughout the bouquet to provide color contrast and visual rest areas. Position leaves to fill gaps between flowers while maintaining natural growth patterns.
Managing Wire Thickness
Bundle all stem wires at the same point approximately 2 inches below the lowest flower. Secure with additional wire wrapping before trimming to final length.
Final Assembly
Allow some stems to curve naturally rather than forcing rigid positions. Controlled irregularities make handmade arrangements appear more organic and less manufactured.
Test the bundle’s stability by gently lifting the bouquet by its wrapped stem area.
Continue on your article: 22+ Free Crochet Dragon Patterns You Need to Try
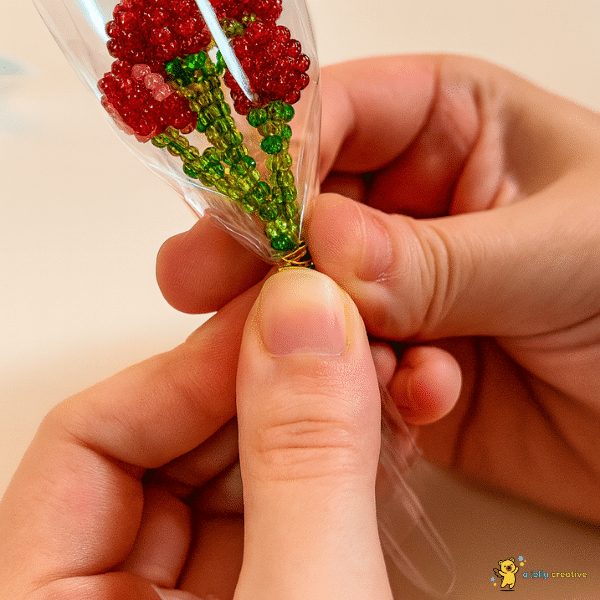
Wrapping the Bouquet
Choose wrapping materials that complement rather than compete with your delicate beadwork. Clear or translucent cellophane allows full visibility while providing protection.
Securing the Bouquet
Bundle stems securely at the designated gathering point using additional wire wrapping techniques. Ensure all individual flower stems are included in the bundle and properly aligned.
Preparing the Cellophane
Select sheets large enough to wrap completely around the bouquet with sufficient overlap for secure closure. Cut material cleanly to prevent rough edges.
Quality cellophane provides clarity and protection without detracting from the bouquet’s beauty.
Creating the Wrap
Position the bouquet face-down on cellophane to prevent petal damage during wrapping. Gather material evenly around stem bundles, creating smooth lines.
Inserting the Bouquet

Handle wrapped bouquets gently, gripping only the wrapped stem area rather than touching cellophane-covered flower portions. This prevents fingerprints on clear surfaces.
Securing the Wrap
Use coordinating ribbon to secure cellophane wrapping with simple bow ties. Avoid complex knots that might snag on delicate beadwork.
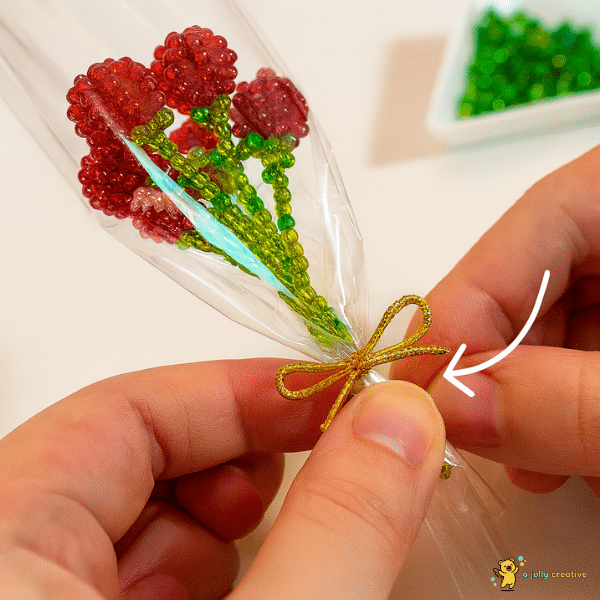
Choose satin or silk ribbons that coordinate without exactly matching flower colors.
Final Trimming
Remove any excess cellophane or ribbon that detracts from the bouquet’s clean lines. Trim carefully to avoid accidentally cutting structural elements.
Making the Bow
Select high-quality ribbon in coordinating colors that enhance rather than compete with your seed bead crafts. Satin or silk textures provide luxury feel while maintaining appropriate scale.
Materials Needed
Choose widths proportional to bouquet size. Quality ribbon justifies higher costs through improved appearance and durability in finished presentations.
Step-by-Step Bow Instructions
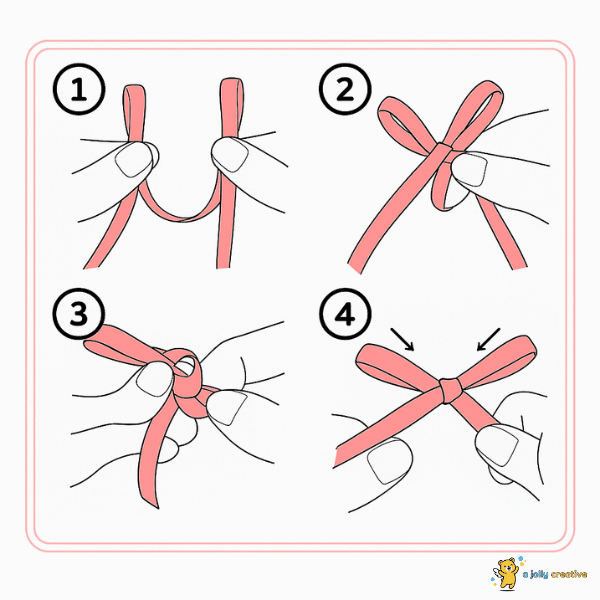
Create classic bow shapes using traditional florist techniques adapted for miniature scale. Form initial loops of equal size, then create center wrap.
Finishing the Bow
Trim bow tails to appropriate lengths that complement bouquet proportions without overwhelming the delicate flower work. Angle cuts prevent fraying.
Attaching to Your Bouquet
Secure bows to wrapped bouquets using techniques that don’t damage underlying cellophane or flower arrangements. Position attachments where they enhance beautiful beadwork.
Don’t miss our article on: 22+ Free Bear Amigurumi Patterns for Crochet Lovers
Making the Card
Design custom cards using proportions that complement your miniature flower bouquet DIY scale. Standard business card sizes work well for most miniature bouquets.

Consider folded card options that provide interior writing surfaces while maintaining compact exterior dimensions.
Card Dimensions
Proper scale relationships ensure cards enhance rather than dominate finished presentations. Use cardstock in colors coordinating with flower palettes.
Creating Your Card
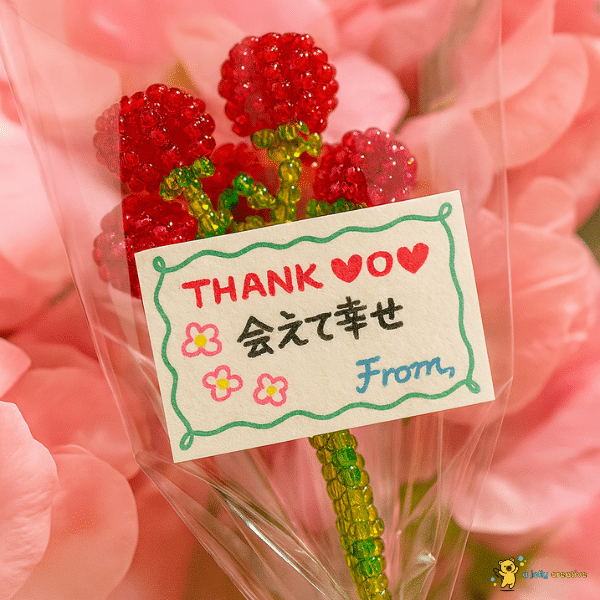
Keep designs simple and elegant, allowing handwritten messages to provide personal touches that make gifts more meaningful. Avoid overly textured surfaces.
Design Tips
Include subtle references to Spirited Away through color choices or simple graphic elements. Hand-drawn soot sprites or delicate border patterns connect cards to bouquet inspiration.
Attaching the Card
Secure cards using methods that don’t damage bouquet wrapping or interfere with flower arrangements. Small ribbon ties or decorative clips work well.
Position cards where they’re easily noticed without hiding beautiful flower details.
Final Touch – Mini Bottle Display
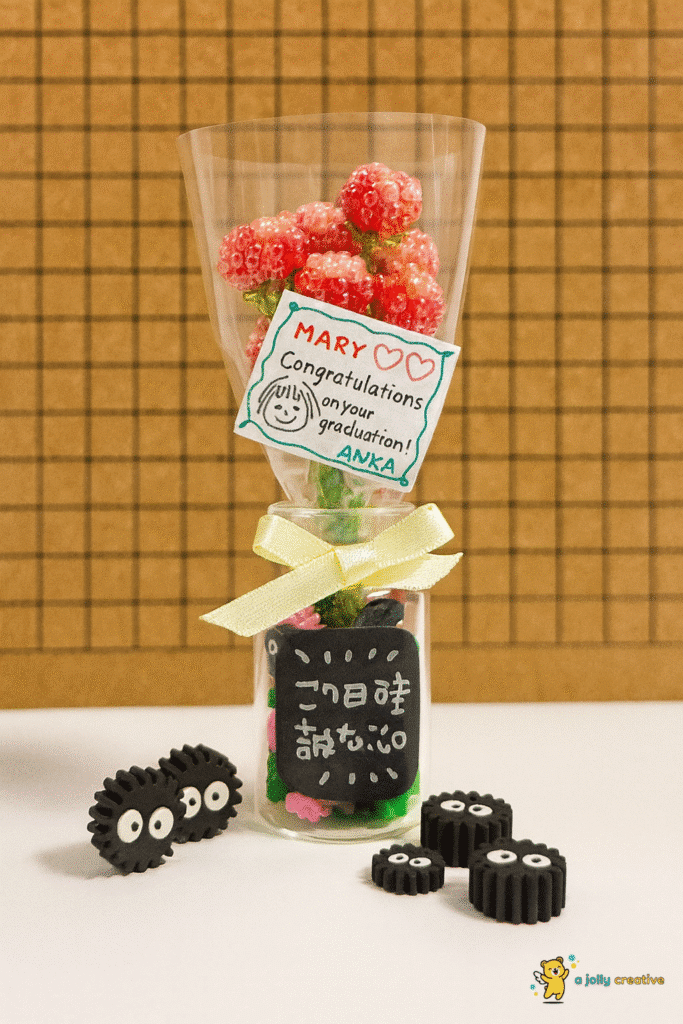
Transform your miniature crafts into permanent installations using glass bottles or display domes. Choose containers providing adequate space while maintaining intimate scale.
Creating a Magical Display
Include small decorative elements that enhance magical atmospheres without overwhelming main attractions. Tiny pebbles or artificial moss create enchanting environments.
Adding Miniature Magic
Background materials should support rather than compete with detailed flower work for viewer attention. Crystal chips or small stones add sparkle.
Practical Benefits
Enclosed displays protect delicate miniature seed bead projects from dust, handling damage, and environmental factors. Glass containers provide clear viewing while creating controlled environments.
Wrap-up
Your completed DIY Spirited Away bouquet represents hours of dedicated work resulting in something truly special. The combination of technical precision and artistic vision makes each bouquet a genuine achievement.
Whether displayed as personal art or given as meaningful gifts, these seed bead bouquet creations connect us to magical worlds while developing creative capabilities.
Hi, I’m Hazel Finch, a creativity enthusiast and writer at ajollycreative.com. I share easy drawing ideas, cozy gaming tips, and inspiration for creative hobbies. With a love for all things jolly and relaxing, I aim to help others discover the joy of creating in their own unique way. Follow my journey as I explore the world of art and play, one cozy activity at a time.