

Beading transforms ordinary moments into extraordinary creations. This ancient craft captivates millions because it combines meditation with artistry, letting your hands create while your mind relaxes into a peaceful rhythm.
Easy beading patterns for beginners open doors to endless possibilities. You’ll master fundamental techniques while crafting beautiful jewelry pieces that friends will beg you to make for them too.
Chain Pattern Step by Step Instructions

The chain pattern forms the foundation of beginner beading projects.
Step 1: Cut 24 inches of beading thread and tie a small securing knot at one end to prevent beads from sliding off. Thread your needle carefully, ensuring the thread doesn’t fray or split during the initial setup process for smooth beading.
Step 2: String your first bead and slide it down to the knot, then add the second bead directly against it. Pass the needle back through the first bead to create the initial link in your chain pattern formation.
Step 3: Continue adding beads one at a time, always passing through the previous bead to maintain consistent connections. Keep tension even throughout the process, avoiding loose gaps or overly tight sections that could break under stress.
Step 4: Repeat the linking process for 15-20 beads, creating a flexible chain that moves naturally when completed. Secure the final connection with an extra pass through the last two beads, then trim excess thread carefully.
Bee Pattern
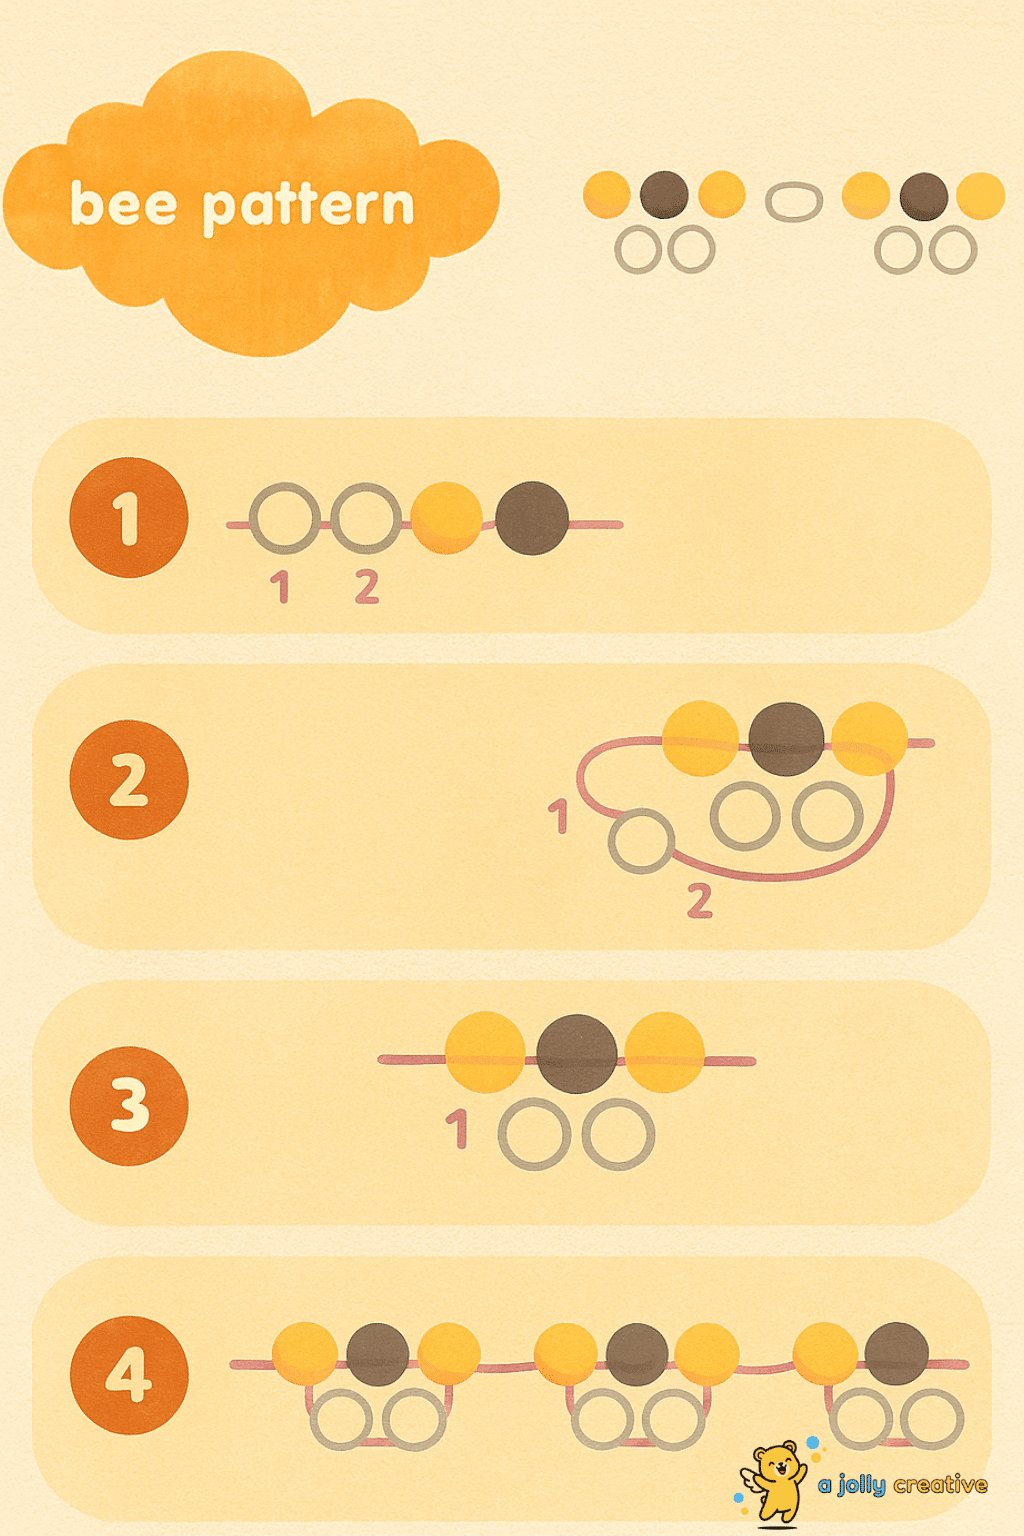
Bee patterns introduce color alternation while creating recognizable insect shapes.
Step 1: Begin with the bee’s head using 3 yellow seed beads arranged in a triangular formation for proper proportions. Add the thorax section with alternating yellow and black beads, creating the characteristic striped pattern that identifies bees.
Step 2: Continue the body with 2 black beads, then 3 yellow beads, repeating this pattern twice for realistic segmentation. Shape the abdomen slightly wider than the thorax by adjusting thread tension and bead placement for natural bee proportions.
Step 3: Create translucent wings using clear or white beads, making four wings of slightly different sizes for movement. Attach wings to the thorax section, positioning them to extend naturally from both sides of the bee’s body.
Step 4: Add thin black antennae using single beads on fine wire, completing your buzzing friend’s characteristic appearance. Secure all connections with extra thread passes, ensuring your bee maintains its shape during handling and wear.
You may also like to read: 23+ Cute & Free Bunny Amigurumi Patterns
Cute Bow Pattern
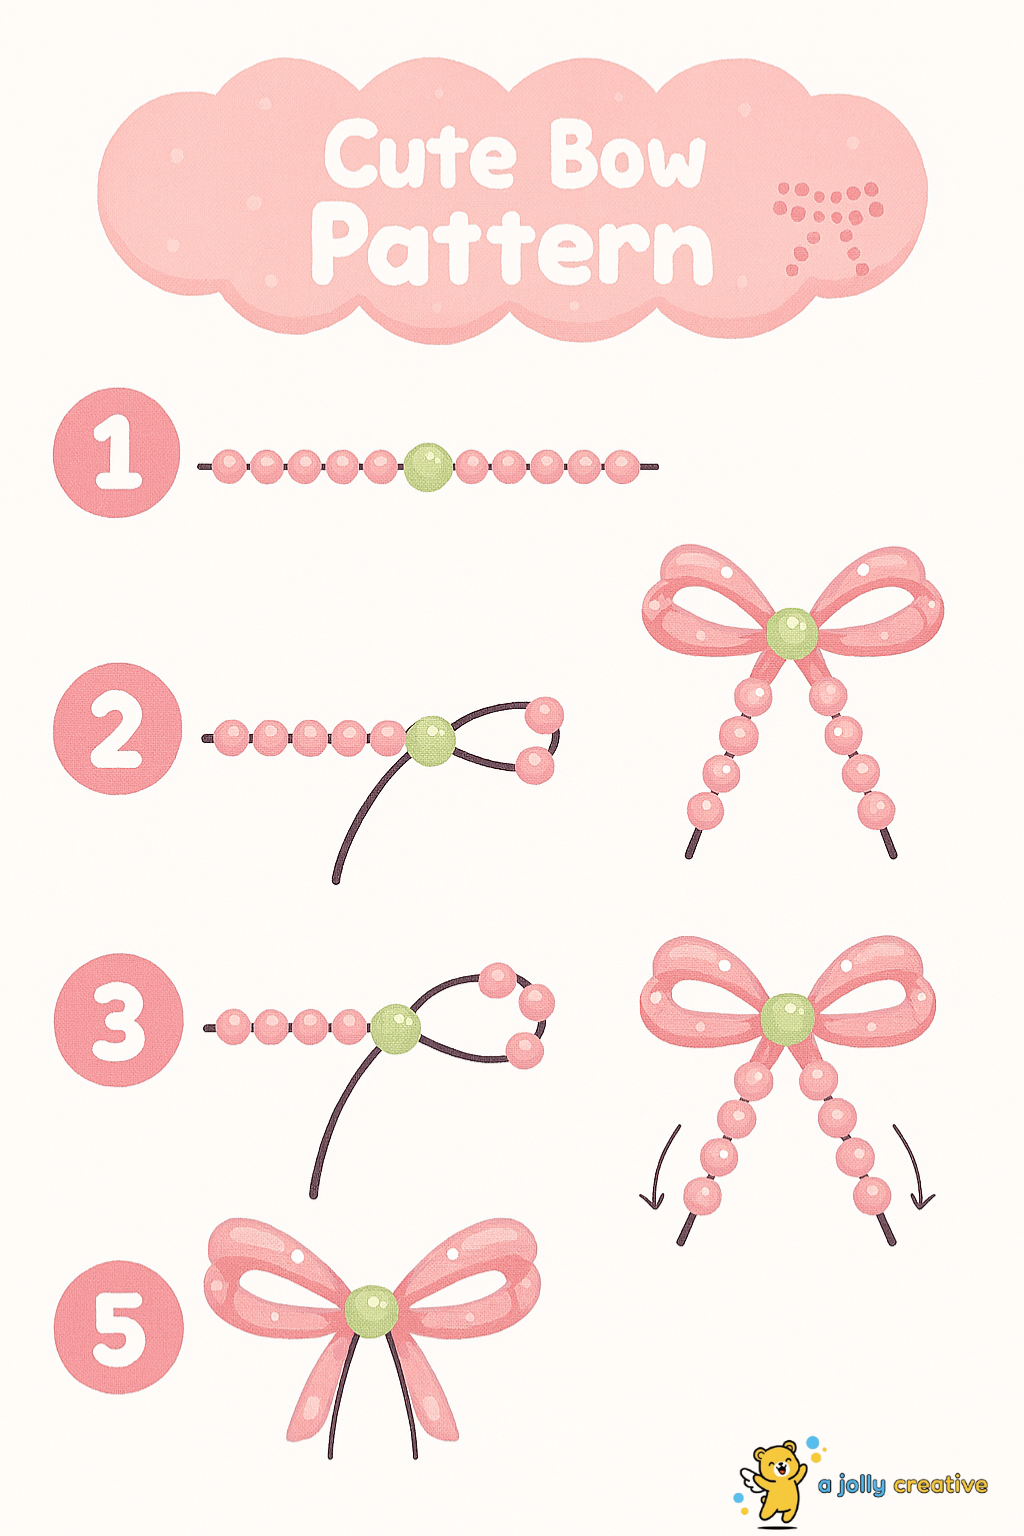
This adorable bow pattern introduces symmetry concepts while creating versatile accessories. The simple beading pattern teaches proportion and balance through ribbon-like formations.
Bow Pattern Step-by-Step Instructions
Step 1: Thread your needle with 18 inches of pink thread, then select matching pink and white seed beads for contrast. Create two identical loops using 10 beads each, forming the basic bow wing structure that will define your finished piece.
Step 2: Shape each loop by passing the thread back through the starting bead, creating rounded wing formations. Adjust tension carefully to maintain consistent loop sizes while avoiding thread tangles or uneven spacing between beads.
Step 3: Add the center knot using 4 white beads, wrapping them tightly around the junction where both loops meet. Pass the thread through the center multiple times to secure the connection and create the characteristic bow appearance.
Step 4: Create trailing ribbon tails using graduated bead sizes, making one slightly longer than the other for natural movement. Finish with small knots and trim excess thread, ensuring your bow maintains its shape during regular wear.
Cherry Bead Pattern
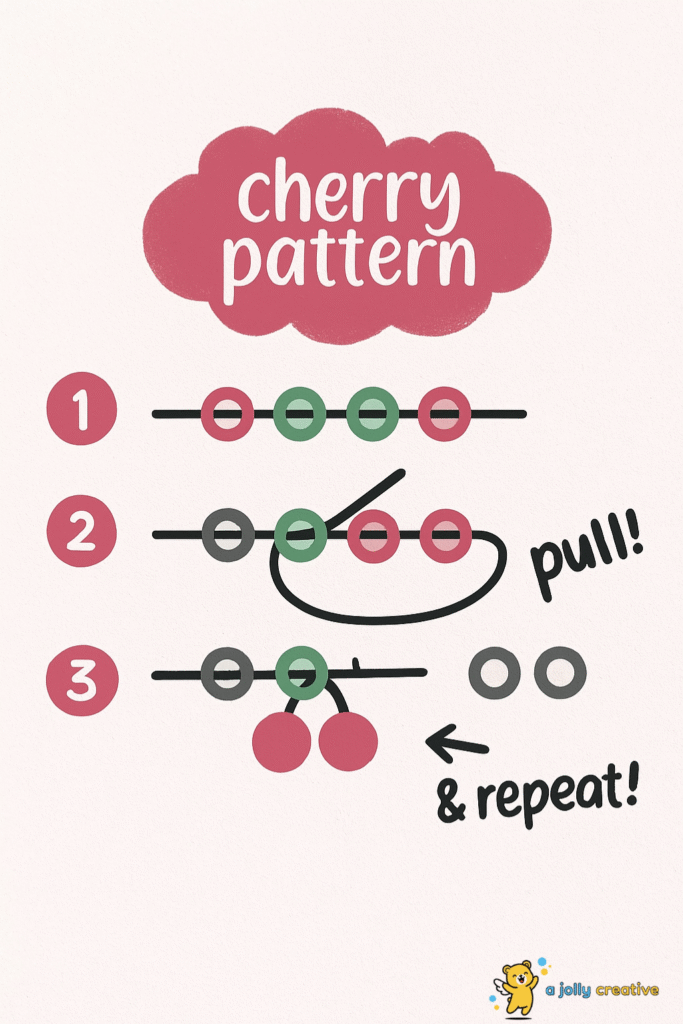
Cherry patterns combine color coordination with shape recognition skills.
Step 1: Select bright red seed beads for the cherry fruits and fresh green beads for stems and leaves. Thread your needle with matching red thread to maintain color consistency throughout the cherry construction process.
Step 2: String two red beads together, then pass the needle back through the first bead to form one complete cherry. Pull gently to create a rounded cherry shape while maintaining enough space for the second cherry formation.
Step 3: Add 3-4 green beads for the connecting stem, creating a gentle curve that looks natural and organic. Form the second cherry using the same technique, ensuring both fruits are similar in size and shape.
Step 4: Complete the design with small green leaf accents positioned near the stem junction for realistic botanical details. Secure all connections with careful thread management, creating a durable cherry pair that won’t separate during use.
If you’re interested, check out: 18 Beginner-Friendly Cozy Hobbies to Try
Zigzag Bead Pattern

Zigzag patterns develop geometric precision and angle control.
Step 1: Plan your zigzag pattern on paper first, marking equal distances between each directional change point. Choose two contrasting bead colors that will highlight the geometric pattern and create visual impact when completed.
Step 2: String 5 beads in the first color moving upward at a 45-degree angle, maintaining consistent spacing. Add 5 beads in the second color moving downward at the same angle, creating the first complete zigzag formation.
Step 3: Continue alternating directions every 5 beads, keeping angles consistent and thread tension even throughout the pattern. Monitor your work regularly to ensure straight lines and sharp directional changes without curves or irregularities.
Step 4: Complete 6-8 full zigzag cycles depending on desired length, then secure with strong finishing knots. Trim excess thread carefully while maintaining the pattern’s sharp geometric appearance and structural integrity.
Frog Ring Bead Pattern

Frog rings teach curved shaping and dimensional construction.
Step 1: Form the frog’s body using 8 bright green seed beads arranged in a slightly flattened oval shape. Thread elastic cord through the beads while maintaining the body’s rounded appearance and proper proportional balance.
Step 2: Create protruding eyes using 2 larger green beads positioned on top of the head area. Add tiny black beads on top of the green eye beads to create realistic pupils that give personality.
Step 3: Shape small webbed feet using 4 smaller green beads that extend slightly from the body sides. Position the feet to look natural while ensuring they don’t interfere with comfortable ring wearing.
Step 4: Complete the ring band with additional green beads, adjusting for proper finger fit and comfort. Secure all connections with strong knots, ensuring the frog sits properly on top without spinning around.
You might find this interesting: 13+ Cute & Free Miffy Amigurumi Patterns
Daisy Bead Pattern
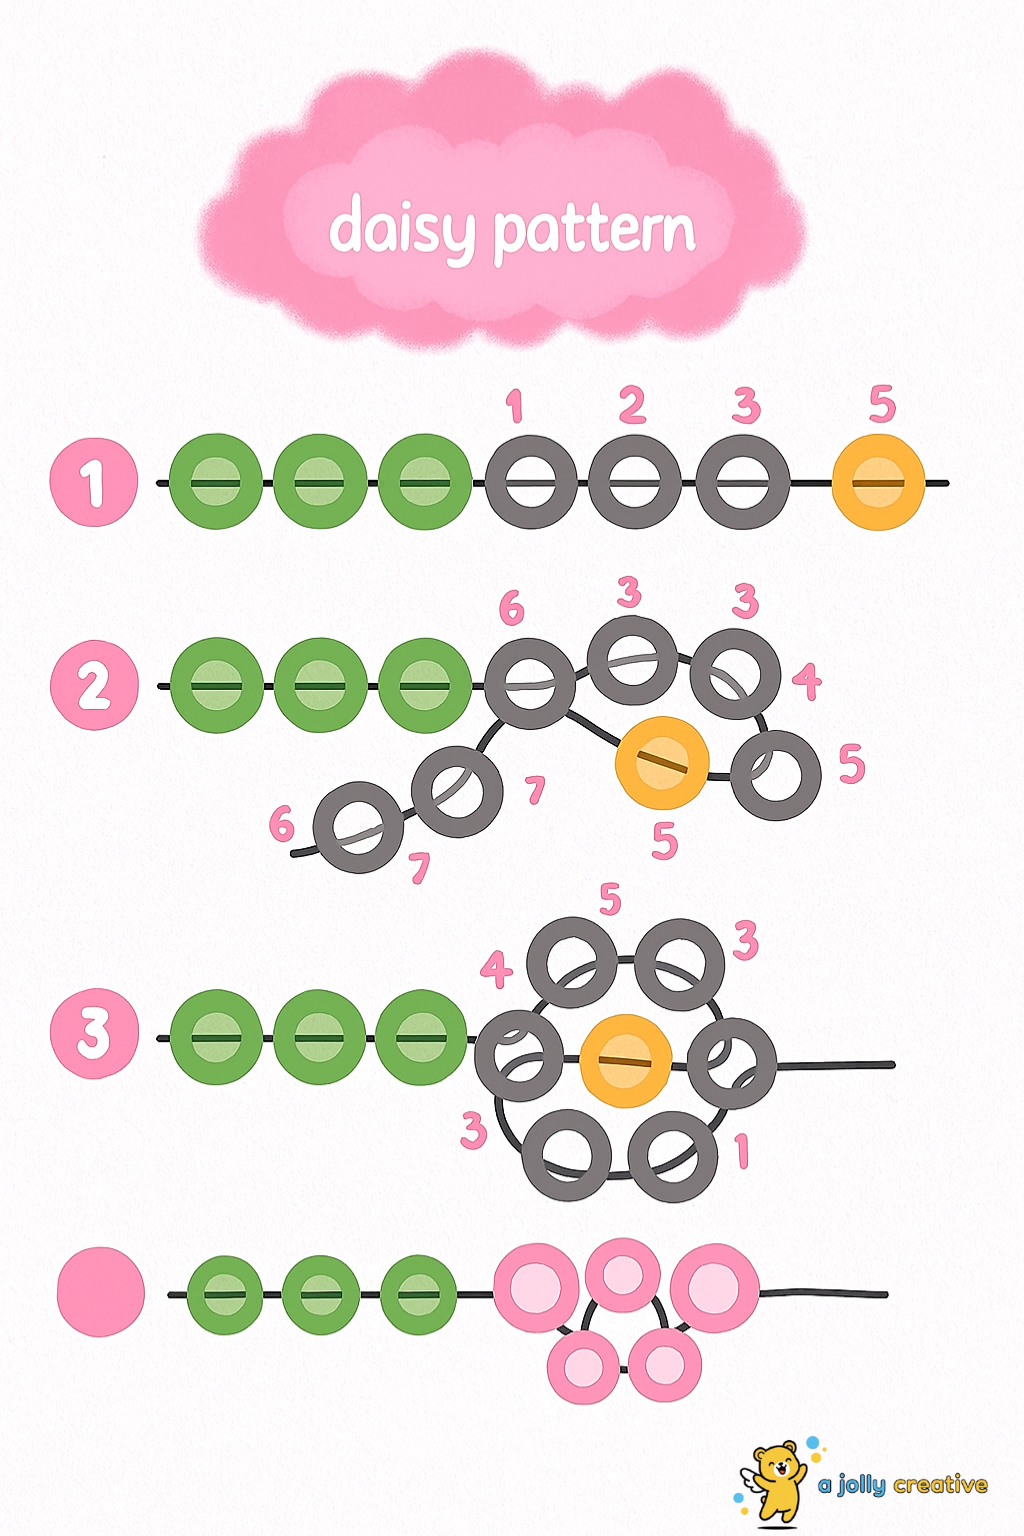
Daisy patterns teach radial symmetry and petal formation.
Step 1: Create the flower center using 4-6 small yellow seed beads arranged in a tight circular formation. Ensure the center beads are securely connected and positioned to support the surrounding petal structure effectively.
Step 2: Add 8 white petal beads around the yellow center, spacing them evenly for balanced flower proportions. Pass the thread through the center beads multiple times to secure each petal in its proper position.
Step 3: Create a green stem using 8-10 green beads in a straight line extending downward from the flower. Add small green leaf beads along the stem for botanical accuracy and enhanced visual appeal.
Step 4: Secure all flower components with careful thread management, ensuring petals remain properly positioned during wear. Finish with strong knots and trim excess thread while maintaining the daisy’s delicate natural appearance.
Cat Ring Bead Pattern
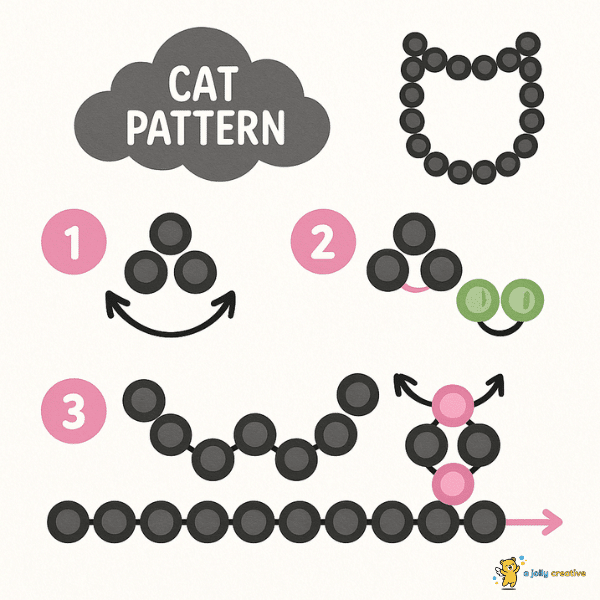
This DIY beading project teaches ring construction basics while creating conversation-starting accessories that showcase your love for felines.
Step 1: Measure your finger circumference accurately, then cut elastic beading cord 2 inches longer than needed. Select gray seed beads for the cat’s body and tiny pink beads for inner ear details and nose accents.
Step 2: Create the cat’s triangular head using 6 gray beads arranged to form a pointed chin and rounded top. Position two pointed ears using 2 gray beads each, adding small pink beads inside for realistic ear coloring.
Step 3: Form the cat’s body with 8-10 gray beads in an oval shape, maintaining proper proportion to the head size. Add facial features using black seed beads for eyes and a single pink bead for the nose.
Step 4: String the remaining ring portion with coordinating beads in a pattern that complements the cat design. Tie the elastic cord securely with multiple knots, ensuring the ring fits comfortably without being too loose.
Grape Bead Pattern
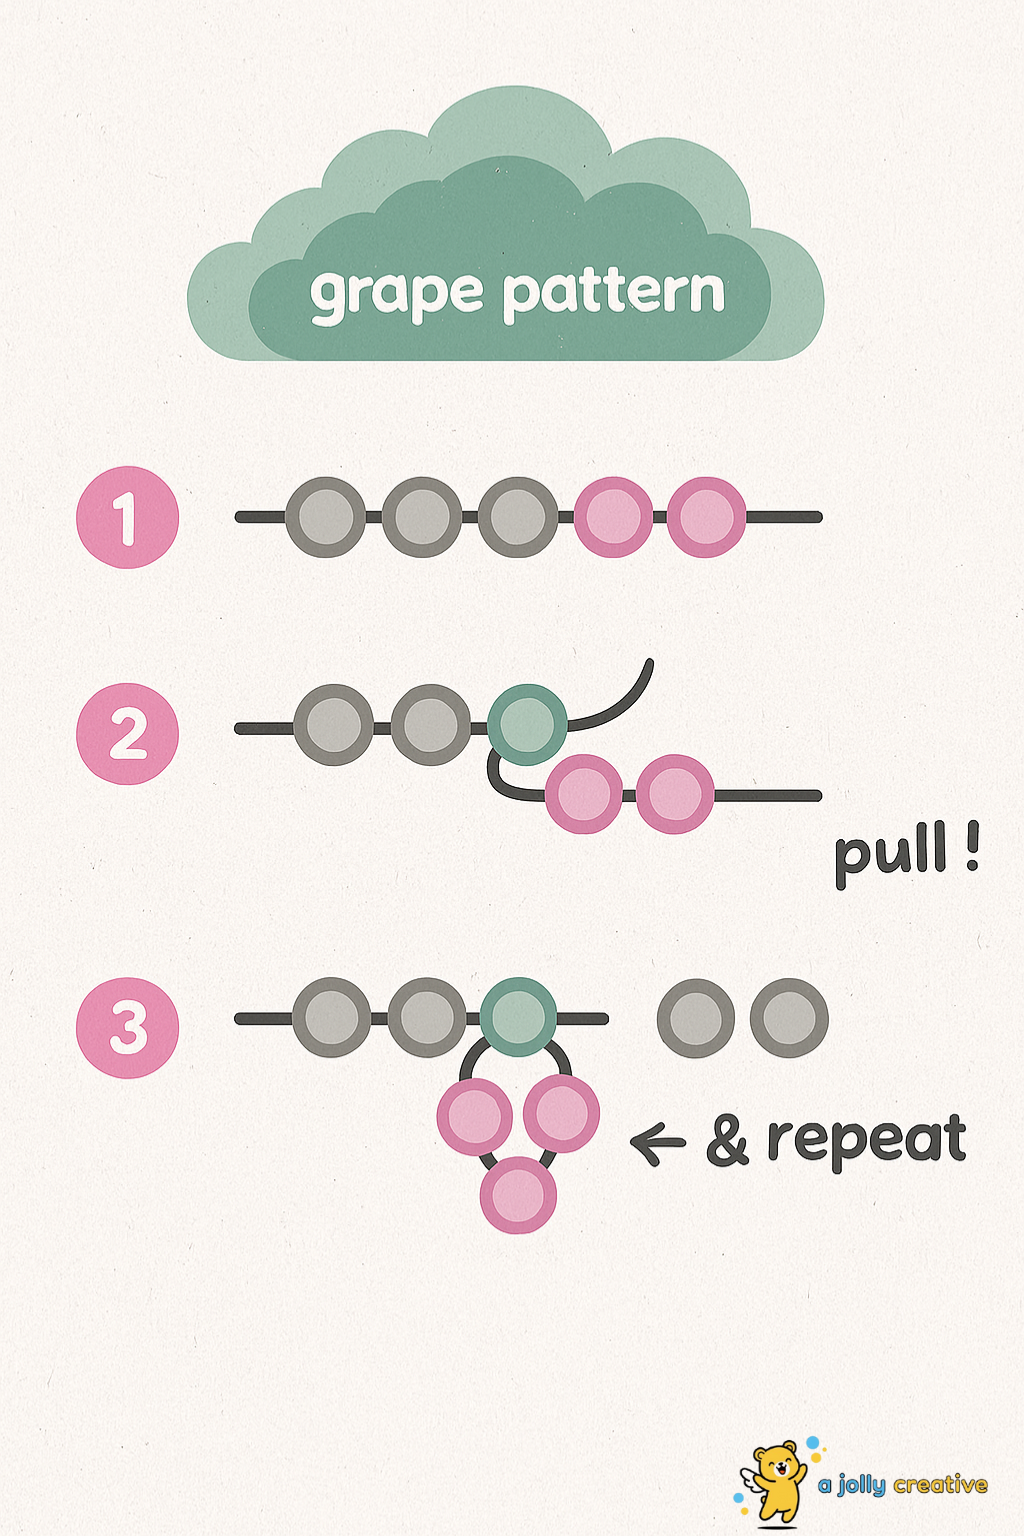
Grape clusters teach layering techniques and dimensional thinking.
Step 1: Begin at the top with a single purple bead, then add 2 beads in the second row below. Continue expanding each row by one additional bead until reaching the cluster’s widest point of 5 beads across.
Step 2: Maintain the natural teardrop shape by gradually decreasing back to single beads at the cluster bottom. Adjust thread tension to create a three-dimensional appearance rather than a flat, two-dimensional grape formation.
Step 3: Add realistic details with brown beads for the stem and small green beads for leaves. Position the stem and leaves to look natural while enhancing the overall grape cluster’s botanical accuracy.
Step 4: Secure all grape beads with multiple thread passes, ensuring the cluster maintains its dimensional shape. Complete the design with careful finishing knots that preserve the grape cluster’s natural draping movement.
Continue on your article: Free Legendary Pokémon Coloring Pages (PDF Printables)
Hopeful Bunny Head Design
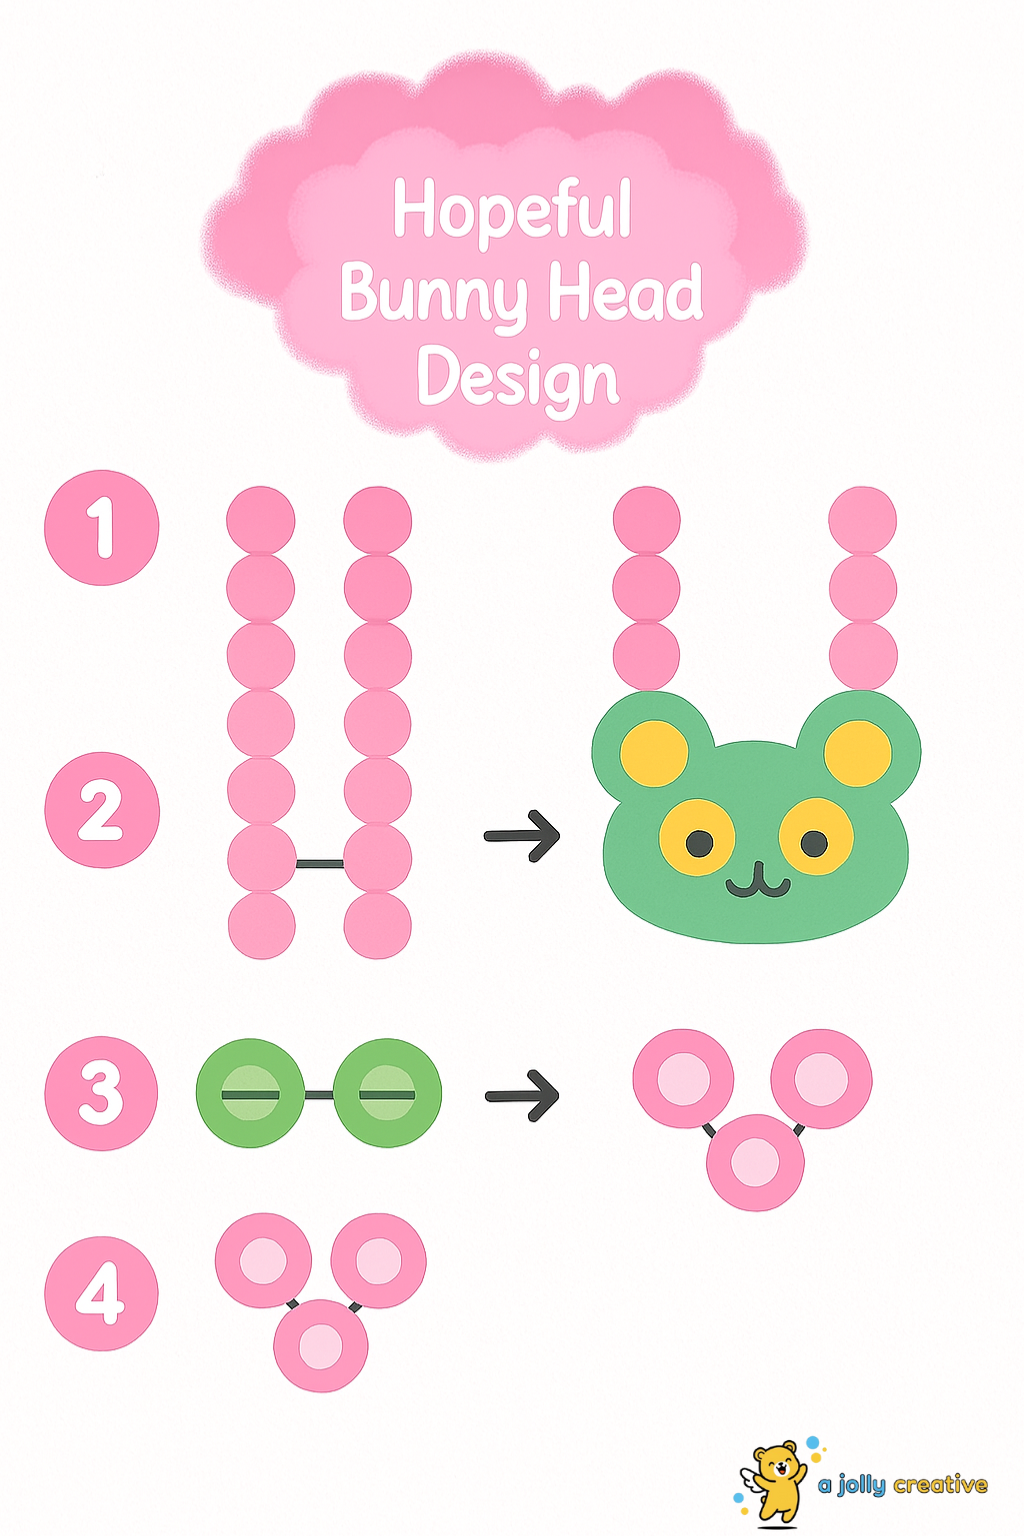
This detailed bunny head builds advanced shaping skills.
Step 1: Form a rounded head shape using 12-16 white seed beads arranged in a circular, three-dimensional formation. Create fuller cheeks and forehead areas by adjusting bead placement and thread tension for realistic facial proportions.
Step 2: Position long upright ears using 6-8 white beads per ear, adding pink beads for inner ear coloring. Shape each ear with gentle curves that look natural while maintaining structural integrity and proper attachment.
Step 3: Place facial features precisely using black beads for expressive eyes and pink for the twitching nose. Add personality through careful eye positioning and consider slight variations in placement for individual character expression.
Step 4: Complete the design with whisker details using fine thread or thin wire for delicate finishing touches. Secure all facial elements with multiple thread passes, ensuring features remain properly positioned during handling and display.
Don’t forget to explore more of my drawing ideas: Pikachu Coloring Pages (Free PDF Printables)
Conclusion
These easy beading patterns for beginners transform simple materials into treasured creations. Each pattern builds essential skills while producing beautiful results you’ll proudly wear or gift to others.
Start with basic patterns to master fundamental techniques, then progress through increasingly complex designs. Your confidence will grow with each completed project, opening doors to advanced beading techniques and original designs that reflect your unique creative style.
Hi, I’m Hazel Finch, a creativity enthusiast and writer at ajollycreative.com. I share easy drawing ideas, cozy gaming tips, and inspiration for creative hobbies. With a love for all things jolly and relaxing, I aim to help others discover the joy of creating in their own unique way. Follow my journey as I explore the world of art and play, one cozy activity at a time.